tips for hacking, Google tips,computer terms, spyware ,administrator hack,types of viruses,dvd movie backup,MICROSOFT, articles .

*******************************************WELCOME*************************************************

Welcome to all the people to COMPUTER MANIA , those who want to grow interest in computer world and become a perfect computer operator with having good knowledge of hacking,viruses ,worms,computer functinality,softwares,solution of many pc problems and many more.....

spott

Spottt
Spottt

Google search

10/26/10

Speed Up Your Computer

Speed Up Your Computer
This step-by-step guide will walk you through some simple steps to speeding up a computer. The following tasks are going to be the highest impact tasks that you can try. Hopefully your PC will be brought back up to a normal speed after finishing these steps.

1) Remove Viruses - The most common reason for a slow computer is a virus. The first thing you will want to do is remove any viruses that may be infecting your computer. Read More About Removing Viruses

2) Remove Spyware - The next most common reason for a slow computer is spyware or malware. You will want to run a spyware check and remove any spyware that the spyware program finds. Read More About Removing Spyware

NOTE: We have reviewed many virus/spyware removal applications. You can check out our recommendations on our Recommended Computer Software page.

3) Clean Your Registry - Your registry can become cluttered over time. This clutter can slow down your computer a bit. Run a registry cleaner to fix any issues. Read More About Cleaning Your Registry

4) Free Up Disk Space - If your computer is low on disk space, freeing up disk space can help speed up your PC. Freeing up disk space will also help out with step 5, defragging. Read More About Freeing Up Disk Space

5) Defragment - This will help your hard drive run much more efficiently. If you haven't defragmented in awhile, we would recommend running the defrag multiple times. Read More About Defragmenting

6) Disable Windows Indexing Service - The Windows Indexing Service is always running in the backround on your PC and can slow your PC down a bit. Disabling this can give a small speed boost. Read More About Disabling Windows Indexing Service

7) Optimizing Windows Startup Programs - When Windows starts up it automatically loads a number of programs, many of which you may not need all the time and can be started when needed. Read More About Optimizing Windows Startup Programs

8) Disable Unnecessary Services - ADVANCED - Services are programs that are continuously running in the background of Windows and are doing different tasks that Windows needs done. There are a lot of these services and they can use a lot of resources. The good news is that a lot of these services are expendable and can be turned off without any problems. This is an ADVANCED TASK. Read More About Disabling Unnecessary Services

9) Clean your Computer - The inside of a computer tower can get dusty over time. This dust will cause the fans will cause the cooling equipment to not work as well as when you first bought the computer. This excess heat can slow a computer. Read More About Cleaning your Computer

10) Upgrading Memory - If the computer is still slow, then you may have to upgrade or buy a new computer. A memory upgrade is the only upgrade we recommend for the novice to intermediate computer user. It is inexpensive and can make a HUGE difference if your computer is low on memory.

11/15/09

WINDOWS XP Speed Tweak

First of all, this tweak only apply to those who only have one HDD on their primary IDE channel (nothing else on device 0 or 1) and a CD-ROM and/or DVD-ROM on the secondary IDE channel. Each time you boot Windows XP, there's an updated file called NTOSBOOT-*.pf who appears in your prefetch directory (%SystemRoot%Prefetch) and there's no need to erease any other files as the new prefetch option in XP really improves loading time of installed programs. We only want WindowsXP to boot faster and not decrease its performance. Thanks to Rod Cahoon (for the prefetch automation process...with a minor change of mine) and Zeb for the IDE Channel tweak as those two tricks, coupled together with a little modification, result in an EXTREMELY fast bootup:
1. Open notepad.exe, type "del c:windowsprefetch tosboot-*.* /q" (without the
quotes) & save as "ntosboot.bat" in c:
2. From the Start menu, select "Run..." & type "gpedit.msc".
3. Double click "Windows Settings" under "Computer Configuration" and double
click again on "Shutdown" in the right window.
4. In the new window, click "add", "Browse", locate your "ntosboot.bat" file & click
"Open".
5. Click "OK", "Apply" & "OK" once again to exit.
6. From the Start menu, select "Run..." & type "devmgmt.msc".
7. Double click on "IDE ATA/ATAPI controllers"
8. Right click on "Primary IDE Channel" and select "Properties".
9. Select the "Advanced Settings" tab then on the device 0 or 1 that doesn't have
'device type' greyed out select 'none' instead of 'autodetect' & click "OK".
10. Right click on "Secondary IDE channel", select "Properties" and repeat step 9.
11. Reboot your computer.WindowsXP should now boot REALLY faster.

What is WinSxS Folder and How to clean it?

The folder contains thousands of files and occupies Gigabytes of space.
Info about this folder
The folder called WinSxS stands for Windows Side-by-Side and is used to store versions of Windows components that are built to reduce configuration problems with Dynamic Link Libraries (DLL Hell). Multiple versions of components are stored in this folder.
In short this folder usually does not contain any useful data contents of which may be deleted to reclaim the occupied huge space.
However cleaning this is not easy if the folder does not get clean up by executing a disk cleanup then you might have to format the system to get the used space.

7/19/09

Solution to “This operation has been cancelled due to restrictions in effect on this computer”


“This operation has been cancelled due to restrictions in effect on this computer. Please contact your system administrator”.

Cause of the problem:

The problem is confirmed to be caused due to change in the default web browser or the Internet Explorer.

Steps to fix the problem:

You can try following solutions and see which one fix it for you.

Solution 1:

• Go to Control Panel -> Add Remove Programs, click on Set Program Access and Defaults.


• Open up the configuration whichever is selected and change the default web browser to something else.

Solution 2:

• If you use older versions of IE then upgrade it to the latest one.

Solution 3:

The problem can be caused due to the corrupt or damaged key HKEY_Local_Machine\Software\Classes\htmlfile\shell\open\command.

So just download this file, unzip it and double click to extract the registry.

Solution 4:

• Open registry editor and search (Ctrl + F) for the value nocontrolpanel.
• Change its value from 1 to 0.

6/30/09

Hide a Drive or Partition with TweakUI in Windows

The advantage of hiding a disk drive is that this method not only hide your data but also make it invisible to those who are a threat to your secret files. You can prevent the unauthorized access to your data.
The method is best to use when you have lot of data to protect then what you can do is just copy the data in a drive and hide the complete drive instead of hiding those individually.
Drive can be made by using TweakUI
1. So just download it and click on the + sign on the left of My Computer to visit the Drives section.
2. All drives would get listed there, uncheck the one you want to hide and click OK.

3. That’s it; your drive will get hidden.

You can see my hidden E drive above.

However I checked that if you enter the drive name in the Run Box you can still open it.

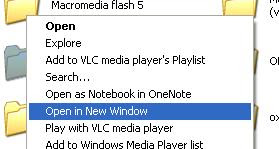
Add Open in New Window Option to Right Click Context Menu of Folders and Drives


What you do to open a drive or a folder in a new window? I guess open My Computer again and open the required drive/folder there. But with this trick you can add the option “Open in New Window” to the right click menu of the drive or a folder in Windows.
XP has this feature by default (pressing Ctrl or Shift while double clicking a drive or folder opens in new window) but this is not supported now in latest versions of Windows like Vista and Seven.
Steps:
1. Open the Registry Editor by typing regedit in the Run box
2. Now navigate to the key HKEY_CLASSES_ROOT\Directory\shell.
3. Right click on Shell and select New -> Key and name it as Open in New Window (the name is one which will appear in right click menu).
4. Now again right click on Open in New Window key and create its sub key with the name command.
5. On the right side, double click Default and enter value explorer %1.

6. Open in new Window option will come in right click menu of folder but to make it appear on drive as well create the same keys with same value but on HKEY_CLASSES_ROOT\Drive\shell.
7. If you want to undo, then just delete the keys created by us.

5/13/09

Solution for Invalid Boot.ini Loading from C:\Windows Error

If while booting the computer in normal mode, you see this error message saying that “Invalid Boot.ini, loading from C:\Windows” then here is the solution to fix this error.

The error comes up while booting but after this the system boots normally as if there is no problem.

Cause of the error

The problem is caused due to missing or corrupted boot.ini file which is usually located in the C drive.

Solution

We can solve the problem by providing the same boot.ini file with correct properties.

1. Right click on My Computer -> Advanced -> Startup and Recovery, click Settings.

2. Now click on Edit button besides the line reading “To edit the startup options file manually, click Edit”.

3. This will open the boot.ini file but if it isn’t there then click OK to create a new.

4. Now copy and paste the following code in it

[boot loader]
timeout=30
default=multi(0)disk(0)rdisk(0)partition(1)\WINDOWS
[operating systems]
multi(0)disk(0)rdisk(0)partition(1)\WINDOWS=”Microsoft Windows XP Professional” /fastdetect

5. Click save and exit.

6. A new file boot.ini will be created in the C drive, now we need to give it system attributes.

7. Open command prompt (type cmd in Run box).

8. Type the following command

attrib C:\boot.ini +s +h

and press Enter.

9. The problem is fixed.

So just restart the computer to see the problem gone.