First of all, this tweak only apply to those who only have one HDD on their primary IDE channel (nothing else on device 0 or 1) and a CD-ROM and/or DVD-ROM on the secondary IDE channel. Each time you boot Windows XP, there's an updated file called NTOSBOOT-*.pf who appears in your prefetch directory (%SystemRoot%Prefetch) and there's no need to erease any other files as the new prefetch option in XP really improves loading time of installed programs. We only want WindowsXP to boot faster and not decrease its performance. Thanks to Rod Cahoon (for the prefetch automation process...with a minor change of mine) and Zeb for the IDE Channel tweak as those two tricks, coupled together with a little modification, result in an EXTREMELY fast bootup:
1. Open notepad.exe, type "del c:windowsprefetch tosboot-*.* /q" (without the
quotes) & save as "ntosboot.bat" in c:
2. From the Start menu, select "Run..." & type "gpedit.msc".
3. Double click "Windows Settings" under "Computer Configuration" and double
click again on "Shutdown" in the right window.
4. In the new window, click "add", "Browse", locate your "ntosboot.bat" file & click
"Open".
5. Click "OK", "Apply" & "OK" once again to exit.
6. From the Start menu, select "Run..." & type "devmgmt.msc".
7. Double click on "IDE ATA/ATAPI controllers"
8. Right click on "Primary IDE Channel" and select "Properties".
9. Select the "Advanced Settings" tab then on the device 0 or 1 that doesn't have
'device type' greyed out select 'none' instead of 'autodetect' & click "OK".
10. Right click on "Secondary IDE channel", select "Properties" and repeat step 9.
11. Reboot your computer.WindowsXP should now boot REALLY faster.
My Blog List
spott
 |
 |
11/15/09
What is WinSxS Folder and How to clean it?
The folder contains thousands of files and occupies Gigabytes of space.
Info about this folder
The folder called WinSxS stands for Windows Side-by-Side and is used to store versions of Windows components that are built to reduce configuration problems with Dynamic Link Libraries (DLL Hell). Multiple versions of components are stored in this folder.
In short this folder usually does not contain any useful data contents of which may be deleted to reclaim the occupied huge space.
However cleaning this is not easy if the folder does not get clean up by executing a disk cleanup then you might have to format the system to get the used space.
7/19/09
Solution to “This operation has been cancelled due to restrictions in effect on this computer”

“This operation has been cancelled due to restrictions in effect on this computer. Please contact your system administrator”.
Cause of the problem:
The problem is confirmed to be caused due to change in the default web browser or the Internet Explorer.
Steps to fix the problem:
You can try following solutions and see which one fix it for you.
Solution 1:
• Go to Control Panel -> Add Remove Programs, click on Set Program Access and Defaults.

• Open up the configuration whichever is selected and change the default web browser to something else.
Solution 2:
• If you use older versions of IE then upgrade it to the latest one.
Solution 3:
The problem can be caused due to the corrupt or damaged key HKEY_Local_Machine\Software\
So just download this file, unzip it and double click to extract the registry.
Solution 4:
• Open registry editor and search (Ctrl + F) for the value nocontrolpanel.
• Change its value from 1 to 0.
6/30/09
Hide a Drive or Partition with TweakUI in Windows
The advantage of hiding a disk drive is that this method not only hide your data but also make it invisible to those who are a threat to your secret files. You can prevent the unauthorized access to your data.
The method is best to use when you have lot of data to protect then what you can do is just copy the data in a drive and hide the complete drive instead of hiding those individually.
Drive can be made by using TweakUI
1. So just download it and click on the + sign on the left of My Computer to visit the Drives section.
2. All drives would get listed there, uncheck the one you want to hide and click OK.


You can see my hidden E drive above.
However I checked that if you enter the drive name in the Run Box you can still open it.
The method is best to use when you have lot of data to protect then what you can do is just copy the data in a drive and hide the complete drive instead of hiding those individually.
Drive can be made by using TweakUI
1. So just download it and click on the + sign on the left of My Computer to visit the Drives section.
2. All drives would get listed there, uncheck the one you want to hide and click OK.
3. That’s it; your drive will get hidden.
You can see my hidden E drive above.
However I checked that if you enter the drive name in the Run Box you can still open it.
Add Open in New Window Option to Right Click Context Menu of Folders and Drives
What you do to open a drive or a folder in a new window? I guess open My Computer again and open the required drive/folder there. But with this trick you can add the option “Open in New Window” to the right click menu of the drive or a folder in Windows.
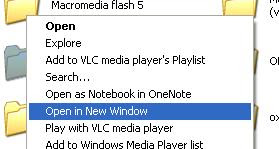
XP has this feature by default (pressing Ctrl or Shift while double clicking a drive or folder opens in new window) but this is not supported now in latest versions of Windows like Vista and Seven.
Steps:
1. Open the Registry Editor by typing regedit in the Run box
2. Now navigate to the key HKEY_CLASSES_ROOT\Directory\shell.
3. Right click on Shell and select New -> Key and name it as Open in New Window (the name is one which will appear in right click menu).
4. Now again right click on Open in New Window key and create its sub key with the name command.
5. On the right side, double click Default and enter value explorer %1.

6. Open in new Window option will come in right click menu of folder but to make it appear on drive as well create the same keys with same value but on HKEY_CLASSES_ROOT\Drive\shell.
7. If you want to undo, then just delete the keys created by us.
5/13/09
Solution for Invalid Boot.ini Loading from C:\Windows Error
If while booting the computer in normal mode, you see this error message saying that “Invalid Boot.ini, loading from C:\Windows” then here is the solution to fix this error.
The error comes up while booting but after this the system boots normally as if there is no problem.
Cause of the error
The problem is caused due to missing or corrupted boot.ini file which is usually located in the C drive.
Solution
We can solve the problem by providing the same boot.ini file with correct properties.
1. Right click on My Computer -> Advanced -> Startup and Recovery, click Settings.
2. Now click on Edit button besides the line reading “To edit the startup options file manually, click Edit”.

3. This will open the boot.ini file but if it isn’t there then click OK to create a new.

4. Now copy and paste the following code in it
[boot loader]
timeout=30
default=multi(0)disk(0)rdisk(
[operating systems]
multi(0)disk(0)rdisk(0)
5. Click save and exit.
6. A new file boot.ini will be created in the C drive, now we need to give it system attributes.
7. Open command prompt (type cmd in Run box).
8. Type the following command
attrib C:\boot.ini +s +h
and press Enter.
9. The problem is fixed.
So just restart the computer to see the problem gone.
5/11/09
Enable or Disable Safe Mode Easily
If you have a disabled Safe Mode because of some virus activity or just want to enable or disable it for some added security then here are the steps to do so.
One of our readers was troubled by the disabled safe mode due to some virus activity, if it is the same case with you, then I am sure the post will help you.
Steps to enable or disable Safe Mode:
Just download this free and small application called Safemode.exe (Enable/Disable SafeMode) that can either disable or enable the Safe Mode for you with just one click.
The software is tested by me and was found to be working great. After I clicked on Disable Safe Mode option, my computer started rebooting whenever I tried to enter into Safe Mode. I restored it back when I clicked the Enable Safe Mode button.
Features:
• Small and free.
• Single click use.
• Password protect the software to limit its use to specific people.
4/29/09
Change Default Drive Icon of USB Pen Drive
simple and easy trick that will bring life to the icon you see whenever you insert your drive.
The trick is very easy and you can put any pic of yours to the icon of your drive.
What you need
• USB drive
• Icon image file in .ico format (you can either download or create your own using this software)
How to make
1. Insert your USB Pen Drive and open it.
2. Create a Notepad file in it and write in the following values as shown below
3. Here Label is the name of the drive and Icon refers to the name of your icon file.
4. Save it and then rename it to “autorun.inf”.
5. Ensure that autorun and ico files are present in the drive all time (you may also hide them).
The drive will show the new icon when you insert it the next time. So tell me how you liked the trick.
Steps to Install .msi files in Linux
MSI files are the popular Microsoft Installer Files used in Windows today to execute and install a program. These files do the same work as other exe files in Windows.
Msi files are mostly setups of applications and Windows can install these files but what if you want to install these files in Ubuntu or Linux?
Wine is a great way to install Windows Installer files in Linux but the only problem with this is that it normally opens exe files only. So here is how to install msi file with Wine in Linux.
Install msi file in Linux
• Open the terminal
• Type in the following command
msiexec /i installer.msi
where installer.msi is the name of your msi file.
That’s it msi file will be opened now in Linux.
4/16/09
Create an ISO Image from a CD/DVD
One big advantage of using ISO image file for CD/DVD is, the image file contains all files/folders and the structure of the CD/DVD, including the hidden sectors, for example, the boot sectors. Some CD/DVD are "bootable", which means you can use the CD/DVD to startup your pc and run some installations or utility. With this kind of CD/DVD, when you view the contents in Windows, you won't see the bootable portion. And when you make a copy of the CD/DVD using the normal method for files, the bootable sectors will NOT be included. However, the Image method will take care of that.
The general way to make copy of a CD/DVD with hidden contents (i.e. boot sectors) is:
(1) Create an ISO image of the CD and store it in local hard drive, then
(2) Burn the image back to a blank CD/DVD.
The general way to make copy of a CD/DVD with hidden contents (i.e. boot sectors) is:
(1) Create an ISO image of the CD and store it in local hard drive, then
(2) Burn the image back to a blank CD/DVD.
The steps of burning an ISO image to CD/DVD are different depending on which tool you use. However, the following key points should be the same:
- Insert the CD/DVD which you want to create the image from.
- Open the burning tool.
- Select the save ISO/image option.
- Browse to the destination location to save the ISO/image file.
- Execute the image capture.
Detailed Steps
If you have not installed a burning program, you can download free CD/DVD burner and install it. Make sure you reboot after the installation.
- Insert the CD/DVD with contents, which you want to create the image from.
- Open the Free Easy CD DVD Burner program.
- Click on the "Copy CD/DVD" button on the top.

- Under the "Action" menu on the left, click the "Copy on your hard disc" link. (Note that if this link is not selectable, then you might have no (or invalid/blank) CD/DVD in your drive.)

- The window "Save your disc as..." opens, browse to the location where you want to save the ISO file. Enter the name of ISO file as you wish to save in the box "File name:" then click "Save".

- The main screen of Free Easy CD/DVD Burner program comes back with the burning process started.
- When the process completed, the message "Image Writing Completed!" displayed.

- Note that this ISO file can be burned back to the CD/DVD only with the ISO option. Burning this ISO file to CD/DVD using the data file method will not extract the files and folders to CD/DVD.
3/5/09
Boot Windows from Pen Drive or USB Flash Drive
We all know how to boot from Bootable CDs but we don’t usually know that we can make our Pen Drives also known as USB Flash Drives and Thumb Drives to boot. Learn "How to Boot from Pen Drive”.

To Boot from USB Drives we need first need to make it Bootable, this is how we can do it:
You need to download a small application called MakeBootable that easily makes the drive bootable. It is very easy and comes with the procedure guide.
Things you need to consider before Booting from Pen Drive:
1. The PC should support booting from USB Device (check this in the BIOS menu).
2. The USB Drive must also support booting.
So Boot from USB Drives and let the CDs become history.
Encrypt USB Data Easily Using True Crypt
Want to transfer some secret information or files from ne computer to another using USB Pen Drive? Or got some important file that needs privacy? Solution is True Crypt.
If you also carry useful data daily from one place to another and are worried that what will happen if the USB drive gets lost, then this utility is for you. Even if your pen drive containing this secret information is lost, you can sit back and relax as the data can not be read by anyone who finds it.
True Crypt is an Open-Source software that can be used to create encrypted folders on the USB drives or the hard drives. Thus its major advantage is that you can install it on the USB Drive itself and use it as a portable application. However you just need the Administrator privileges for this.
Steps to use the software:
• Download the tool True Crypt, and run the setup.
• It will ask to install or extract, click on Extract and select USB drive as the target.
• Run truecrypt.exe on the USB drive, and create a folder first to store all the encrypted files.
• To do that click on “Create Volume” in the main interface and select the option to create an encrypted file container (as shown)

• Browse to the USB device and select a random filename that should be used as the container say abc.txt, abc.avi or anything. Any name or any extension.
• Now select an encryption algorithm, I would suggest AES and a Hash Algorithm like SJA-512

• Choose a password, longer the better.
• Move the mouse around to create random information and click the format button in the end.
• Encryption is complete.
• In order to use the data, you just need to mount the container we just created. This is done by running the trucrypt.exe again from the USB and then browsing to the encrypted container just created.
• You will be asked for the password as shown below.

Happy encrypting!!
Find out the Processes that are Delaying Windows Startup
Almost every one of us is frustrated at the Windows taking a long time to boot the computer. There is nothing much we can do about it but see it taking a little longer at the startup than the last time.
Ever wondered what Windows actually does while booting? There are many processes that are to be started at the booting but which process actually takes the maximum time?
BootLog XP is a Windows Boot Analyzer that analyzes the computer at the next boot and tells us which process is taking what time to load at the startup, thus enabling us to see the actual time taken by each startup process (as shown below).

So what you have to do is just download this tool called BootLog XP and run it in your PC. Click on the “Test at Next Boot” button and restart your computer.

Note: Reboot will take a bit longer than usual as in this case BootLog XP is working in background, so don’t panic.
After the startup you will be presented with a detailed report of the analysis made of the Windows Boot procedure with time of each process being listed in front of it (as shown).

It will also display the total time taken to boot the system. The only limitation of this tool is that it comes under 30 day trial but this is enough to test our system. So remove all those unwanted processes taking much time.
Analyze Windows System Files with Windows File Analyzer
There are many system files and folders created by Windows at various places. Many of these are strange looking and we don’t know what they are doing in the system. But here is a quick info that allows us to analyze various system files created by Windows.
If the files like Thumbs.db and Index.dat have always confused you then this post is surely for you.Windows file analyzer is portable file analysis software that can analyze all those system files that are confusing you.
Not only the above listed files, it can easily analyze index.dat, prefetch, thumbs.db , shortcuts and recycle bins on every drive and give you the related information.

This Windows File Analyzer software will analyze the system files and report the results back in a table. Say if you are analyzing Thumbs.db, then the table will show the thumbnails of the pictures.
The advantage of this tool is that it doesn’t require installation, is portable, works on all Windows Operating System and the reports can be saved for further inspection.
2/2/09
Tutorial: Speeding Up your Windows XP
Hello Guys!
I have wrote this tutorial for all of you using Microsoft Windows XP version of Operating System.
This tutorial helps in speeding up your system significantly.
Before you begin using this tutorial, kindly follow these tips:
- Follow every instructions very carefully.
- Make a back-up copy of your hard disks, in case you do anything wrong.
- Make a system restore point. In case you do anything wrong, you can just restore your PC to earlier settings.
- Before editing the registry, backup the registry first.
- Most changes take place after you reboot your PC.
1. Convert Your Hard Drive to NTFS
If your drive is using FAT16 or FAT32, you can gain performance by converting it to NTFS.
- Click on the Start
- Click Run
- Type cmd
- Enter
- Type CONVERT C: /FS:NTFS
- Enter
NOTE: NTFS drives can only be accessed by Windows 2000/NT/XP and Vista. Older versions of Windows are only compatible with FAT, FAT16 and FAT32.
2. Remove Malware from your System
Spyware comes bundled with a lot of free software found on the Internet. It can slow your machine down to a crawl. Download and install Spybot Search & Destroy, start your computer in Safe Mode and give your machine a full scan for spyware.
3. Disable Indexing Services
Indexing Services is a small little program that uses large amounts of RAM and can often make a computer endlessly loud and noisy. This system process indexes and updates lists of all the files that are on your computer. It does this so that when you do a search for something on your computer, it will search faster by scanning the index lists. If you don’t search your computer often, or even if you do search often, this system service is completely unnecessary.
To disable do the following:
- Click Start
- Click Settings
- Click Control Panel
- Double-click Add/Remove Programs
- Click the Add/Remove Window Components
- Uncheck the Indexing services
- Click Next
- Click OK
Reduce Windows XP can look good ...but displaying all the visual items can waste system resources.
- Click Start
- Right click My Computer
- Go to the Advanced tab in the Performance area
- Click Settings
- Choose "Adjust for best performance"
5. Speedup Folder Browsing
You may have noticed that everytime you open my computer to browse folders that there is a slight delay. This is because Windows XP automatically searches for network files and printers everytime you open Windows Explorer. To fix this and to increase browsing significantly:
- Open My Computer
- Click on Tools menu
- Click on Folder Options
- Click on the View tab
- Uncheck the Automatically search for network folders and printers check box
- Click Apply
- Click Ok
- Reboot your computer
It basically makes sure that your PC uses every last drop of memory (faster than swap file) before it starts using the swap file.
- Click Start
- Click Run
- Type msconfig
- Enter
- Click on the System.ini tab
- Expand the 386enh tab by clicking on the plus sign
- Click on new
- In the blank box type ConservativeSwapfileUsage=1
- Press Enter
- Restart your PC for the changes to take effect
Your desktop background consumes a fair amount of memory and can slow the loading time of your system. Removing it will improve performance.
- Right click on Desktop and select Properties
- Select the Desktop tab
- In the Background window select None
- Click Ok
Windows XP can look sexy but displaying all the visual items can waste system resources. To optimise:
- Click Start
- Click Settings
- Click Control Panel
- Double-click System
- Click Advanced tab
- In the Performance tab click Settings
- Leave only the following ticked
- Show shadows under menus
- Show shadows under mouse pointer
- Show translucent selection rectangle
- Use drop shadows for icons labels on the desktop
- Use visual styles on windows and buttons
If you give your pagefile a fixed size it saves the operating system from needing to resize the page file.
- Right click on My Computer and select Properties
- Select the Advanced tab
- Under Performance choose the Settings button
- Select the Advanced tab again and under Virtual Memory select Change
- Highlight the drive containing your page file and make the initial Size of the file the same as the Maximum Size of the file.
10. Remove Fonts for Speed
Fonts, especially TrueType fonts, use quite a bit of system resources. For optimal performance, trim your fonts down to just those that you need to use on a daily basis and fonts that applications may require.
- Open Control Panel
- Open Fonts folder
11. Disable Services
- Click Start
- Click Run
- Type services.msc
- Enter
For normal use, disable the following services:
- Alerter
- Background Intelligent Transfer Service
- ClipBook
- Computer Browser
- Error Reporting Service
- Help and Support
- Indexing Service
- IPSEC Services
- Messenger
- NetMeeting Remote Desktop Sharing
- Network DDE
- Network DDE DSDM
- Performance Logs and Alerts
- Portable Media Serial Number
- QOS RSVP
- Remote Desktop Help Session Manager
- Remote Registry
- Secondary Logon
- Server
- Smart Card
- Smart Card Helper
- SSDP Discovery Service
- System restore Service
- TCP/IP NetBIOS Helper
- Uninterruptible Power Supply
- Universal Plug and Play Device Host
- WebClient
- Windows time
- Wireless Zero Configuration
- WMI Performance Adapter
12. Remove Unwanted Programs from Startup
- Click Start
- Click Run
- Type msconfig
- Enter
- Click on the Startup tab
- Uncheck any programs you dont want Windows to load at startup
13. Remove Widgets and Background
Different third party widgets and visual styles like for Vista like look and feel make your system slow. If you remove such packages you system will perform better on CPU and memory intensive tasks. Selecting default and no wallpaper as background also gives better performance than that of "high quality" wallpapers.
14. Enable Direct Memory Access (DMA)
- Right Click My Computer
- Select properties
- Select the Hardware tab
- Click the Device Manager button
- Double click IDE/ATAPI controllers
- Keep on checking if DMA is enabled for each, you have to double click each option
- Click Advanced Settings tab. The tab may or may not be available for each option. It is only available in Primary and Secondary Channels.
- Set the transfer mode to "DMA if Available" both for Device 1 and 0
- Perform the same operation for other items in the list, if applicable.
Defrag your disk drives twice a month for faster data access.
- Click Start
- All Programs
- Accessories
- System Tools
- Disk Defragmenter
- Select a drive and click ‘Defragment’
16. Update Windows
I recommend that you use Windows XP Service Pack 3, and update your computer using Windows Update to resolve known security and stability problems. This will give you a stable operating system that has been built to handle your system resources best. Also, make sure all your device drivers are up-to-date.
17. Disable Fast User Switching
- Click Start
- Click Run
- Type control userpasswords
- Enter
- In the User Accounts window, click on Change the way users log on or off
- Make sure the Use the Welcome screen option is ticked
- Uncheck Use Fast User Switching
- Click on Apply Options
- Close the window
18. Make Menus Load Faster
- Click Start
- Click Run
- Type regedit
- Enter
- Find HKEY_CURRENT_USER\Control Panel\Desktop
- Select MenuShowDelay
- Right click and select Modify
- Reduce the number to around 20, but not too less
- Close Registry Editor
- Click Start
- Click Run
- Type regedit
- Enter
- FindHKEY_LOCAL_MACHINE\SOFTWARE\Microsoft\Dfrg\BootOptimizeFunction
- Select Enable from the list on the right
- Right click on it and select Modify
- Change the value to Y to enable
- Enter
- Close Registry Editor
This tweak reduces the time XP waits before automatically closing any running programs when you give it the command to shutdown.
- Click Start
- Click Run
- Type regedit
- Enter
- Find HKEY_CURRENT_USER\Control Panel\Desktop
- Right click WaitToKillAppTimeout & Select Modify
- Change the value to 1000
- Enter
- Right click HungAppTimeout and Select Modify
- Change the value to 1000
- Enter
- FindHKEY_LOCAL_MACHINE\System\CurrentControlSet\Control
- Right click WaitToKillServiceTimeout and select Modify
- Change the value to 1000
- Enter
- Close Registry Editor
Subscribe to:
Posts (Atom)